
A friend of mine from Singapore told me about Singlish. You may think, for example, in the Chinese language. Then you translate it into English as you are able. English Grammar does not really need for you. Article proposed to your attention has been written in this kind language. Excuse me…
Part 1. Location
What is the main problem of home brewer? Right! You can not occupy the kitchen for all your brew day. The wife and children always want to eat. It is very good if you have a Perfect Large Garage for pickup, a tractor and a car of your wife. And there is still some space. I had only a balcony to build my first home brewery. You are lucky if the winter temperature of 64 Fahrenheit. I had to do triple glazing and underfloor heating.

The photo shows a table for the mashtan and a shelf for brewing accessories. During beer fermentation fermenter is placed elsewhere (See below).

On the other hand (on the left of the door) I built a three sections refrigerator. The two upper sections are not only cooled but also heated, which is very useful in winter.

UV is available for disinfection.

Hood is very useful when the wort are boiling.


I can turn on the pump (or UV) sitting on the couch in the room.

Refrigerator compressor and control panel

The upper section of the refrigerator. You can see the CO2 cylinder, CO2 regulator and beer keg.

My fermentor is placed in the middle section of the refrigerator. Here you can see a lot of additional equipment: a compressor for the aeration of the wort, a large flask for a starter, a small flask for yeast culture, sanitizing 0.20 micron filters, etc.

At the bottom (coldest) sections — beer.

Cheers!
Part 2. Yeast culturing
For some reason, White labs (or Wyeast Laboratories) can not deliver me the culture of brewer’s yeast for a couple of days . (Only about a month, and the shipping cost — $50.) For this reason, I have to culturing the yeast myself.

The middle section is also used for the microbiological performance.

This is high-tech device. At the bottom of the glazed cabinet doors are opening for hands.

Powerful compressor pumps air into the section through the cooling system (plastic tank bottom) and two filters (pre and sanitary 0.2 microns). Thus there is an excess pressure of sterile air inside.


There is also a UV disinfection inside the section.

This is my collection of pure cultures of brewer’s yeast. As you can see, I’m getting something from the White labs (big tubes).

First, I check whether the yeast is alive.

Second, if successful, I place the yeast on the agar slant.


Third, I’m trying to get a good yeast by the selection on Petri dishes.

I need a sterile medium. This is my high-tech autoclave.

I sterilize agar slants,

wort agar for filling petri dishes,

test tubes,


and the wort for the starter (inside the 10 L Cornelius by tyndallization).
Part 3. The Day befor brewday
A lot of work!

First, I crack may grain

I do 1l starter with a magnetic stirrer,

(At the bottom there is a pure culture for my beer fermentation).
Part 4. Brewing day
- First — disinfection of equipment
It is necessary to carefully sanitize all equipment:

fermentor (my autoclave is used as the steam generator),

pump and counterflow chiller,

ball valve of brew kettle.
2. Second — mashing

This is mash-tan and a false bottom.

β-amylase rest, α-amylase rest, mash-out.
3. Third — boiling, pumping, cooling and aeration

This is brew kettle.

Wort boiling under the hood.
After boiling hot wort is pumped through a counterflow chiller into the fermenter. Cold wort is aerated in the hose with a sterile air.
4. Fourth — Pitching of yeast

The last thing that is pumped into the fermenter is a culture of brewer’s yeast.
Part 5. Fermentation
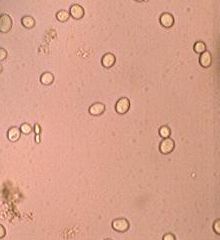
So look brewer’s yeast in my microscope. Now they are working, and I rest.

This is a sample schedule of yeast growing.

Initially, the number of cells is very small, but they are growing rapidly.

In the final of fermentation many strains are floculate and sediment on the bottom of the fermenter.
Part 6. Keging

First, well washed KEG must be disinfected. I use steam for this purpose.

Then KEG must be purged of carbon dioxide and to fill from the fermenter.

This is a carbon dioxide cylinder and regulator, as well as filters for purifying carbon dioxide.
Beer KEG is behind of this door of the refrigerator. A week later the beer is clarified. During this time, the last yeast cells (and other) settle to the bottom. Beer is ready.
Cheers!
